Preserving and Resetting State
State हर एक कॉम्पोनेन्ट के लिए अलग है |. कॉम्पोनेन्ट ui ट्री में कहा है इस आधार पर react state का हिसाब रखता है की कोनसा स्टेट कोनसे कॉम्पोनेन्ट का है | आप पुनश्च रेंडर में state को कब संरक्षित करना है और कब रिसेट करना है यह नियंत्रित कर सकते है |
You will learn
- react state संरक्षित करना है अथवा रिसेट करना है इसका चयन कब करता है
- कैसे react बलपूर्वक कॉम्पोनेन्ट का state रिसेट कर सकता है
- state संरक्षित करने में keys और types कैसे प्रभावित करते है
State is tied to a position in the render tree
React builds render trees for the component structure in your UI. react आपके उपयोगकर्ता इंटरफ़ेस में कॉम्पोनेन्ट संरचना के लिए (रेंडर ट्रीज)बनाता है |
जब आप एक कॉम्पोनेन्ट को state देते हो , तो आप यह कल्पना कर सकते हो की state कॉम्पोनेन्ट के अंदर ‘रहता ’ है | परन्तु state वास्तव में react में पकड़ा हुआ होता है react हर एक कॉम्पोनेन्ट को state का हर एक भाग जो उसने पकड़ा हुआ है , उसे सही कॉम्पोनेन्ट से जोड़ता है की वो कॉम्पोनेन्ट render tree में कहा है
Here, there is only one <Counter /> JSX tag, but it’s rendered at two different positions:
यहाँ वास्तव में केवल एक <Counter /> jsx टैग है, परन्तु वह दो अलग जगह पर रेंडर हुआ है|
import { useState } from 'react';

export default function App() {
  const counter = <Counter />;
  return (
    <div>
      {counter}
      {counter}
    </div>
  );
}

function Counter() {
  const [score, setScore] = useState(0);
  const [hover, setHover] = useState(false);

  let className = 'counter';
  if (hover) {
    className += ' hover';
  }

  return (
    <div
      className={className}
      onPointerEnter={() => setHover(true)}
      onPointerLeave={() => setHover(false)}
    >
      <h1>{score}</h1>
      <button onClick={() => setScore(score + 1)}>
        Add one
      </button>
    </div>
  );
}
Here’s how these look as a tree:
यहां बताया गया है कि ये tree के स्वरुप में कैसे दिखता है |
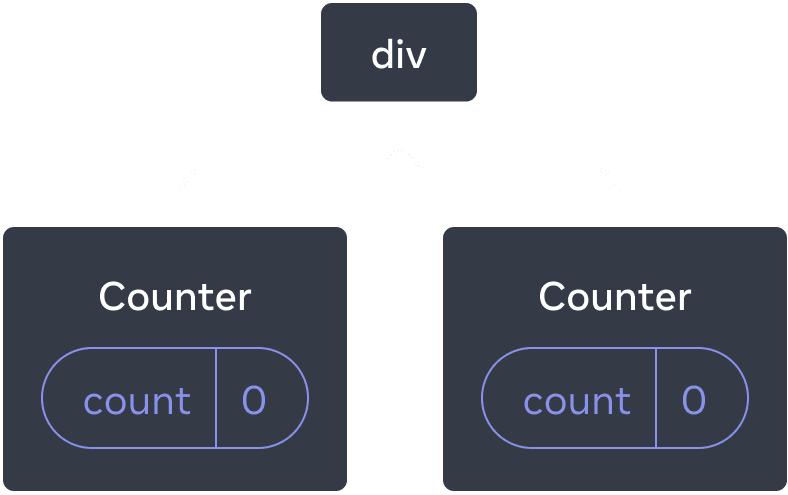
React tree
ये दो अलग अलग counters है क्योंकि हर एक कॉम्पोनेन्ट tree में अपने स्वतंत्र स्थान पर रेंडर हुआ है | आम तौर पर आप को इन स्थानो के बारे में सोचने की आवश्यकता नहीं है, परन्तु यह कैसे काम करता है यह समझने के लिए उपयुक्त होगा |
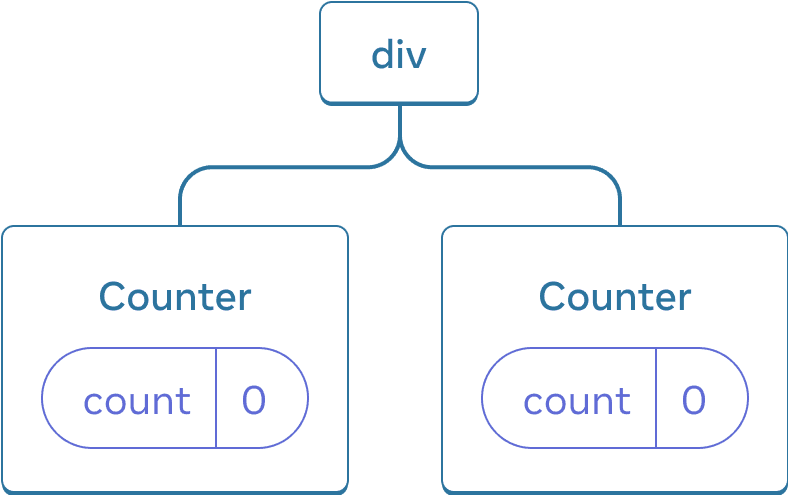
React में, स्क्रीन पर हर एक कॉम्पोनेन्ट का पूरी तरह से अलग state होता है | उदहारण के तौर पर , यदि आप दी counter कॉम्पोनेंट्स एक के बाजु में एक रेंडर करेंगे, तो उनमे से हर एक को अपना स्वतंत्र ‘score ’ और ‘hover ’ state मिलेगा|
दोनों counters को क्लिक करने का प्रयत्न करें और ध्यान दें की वह दोनों एक दूसरे को प्रभावित नहीं करते:
import { useState } from 'react';

export default function App() {
  return (
    <div>
      <Counter />
      <Counter />
    </div>
  );
}

function Counter() {
  const [score, setScore] = useState(0);
  const [hover, setHover] = useState(false);

  let className = 'counter';
  if (hover) {
    className += ' hover';
  }

  return (
    <div
      className={className}
      onPointerEnter={() => setHover(true)}
      onPointerLeave={() => setHover(false)}
    >
      <h1>{score}</h1>
      <button onClick={() => setScore(score + 1)}>
        Add one
      </button>
    </div>
  );
}
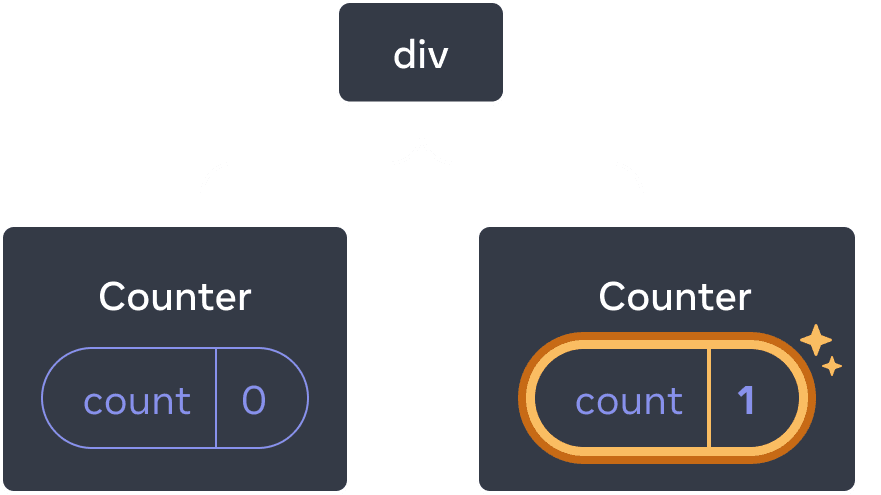
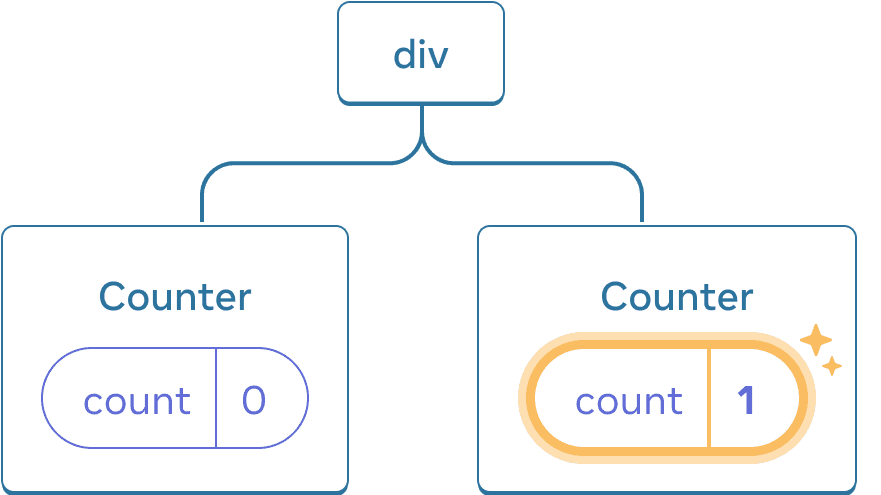
As you can see, when one counter is updated, only the state for that component is updated: जैसा की आप देख सकते हैं , जब एक counter अपडेट होता है तो केवल उसी कॉम्पोनेन्ट की state अपडेट होती है |
Updating state
जब तक आप tree में एक कॉम्पोनेन्ट समान स्थान पर रेंडर करते हैं, तब तक React कॉम्पोनेन्ट state को बनाए रखेगा। इसे देखने के लिए, दोनों counter बढ़ाएँ, फिर “Render the second counter” चेकबॉक्स को अनचेक करके दूसरे कॉम्पोनेन्ट को हटा दें, और फिर उसी चेकबॉक्स को पुनः चेक करके वापस जोड़ दें |
import { useState } from 'react';

export default function App() {
  const [showB, setShowB] = useState(true);
  return (
    <div>
      <Counter />
      {showB && <Counter />}
      <label>
        <input
          type="checkbox"
          checked={showB}
          onChange={e => {
            setShowB(e.target.checked)
          }}
        />
        Render the second counter
      </label>
    </div>
  );
}

function Counter() {
  const [score, setScore] = useState(0);
  const [hover, setHover] = useState(false);

  let className = 'counter';
  if (hover) {
    className += ' hover';
  }

  return (
    <div
      className={className}
      onPointerEnter={() => setHover(true)}
      onPointerLeave={() => setHover(false)}
    >
      <h1>{score}</h1>
      <button onClick={() => setScore(score + 1)}>
        Add one
      </button>
    </div>
  );
}
ध्यान दें कि जैसे ही आप दूसरे counter को रेंडर करना बंद करते हैं, उसकी state पूरी तरह से गायब हो जाती है। ऐसा इसलिए है क्योंकि जब react किसी कॉम्पोनेन्ट को हटाता है, तो यह उसकी State को नष्ट कर देता है।
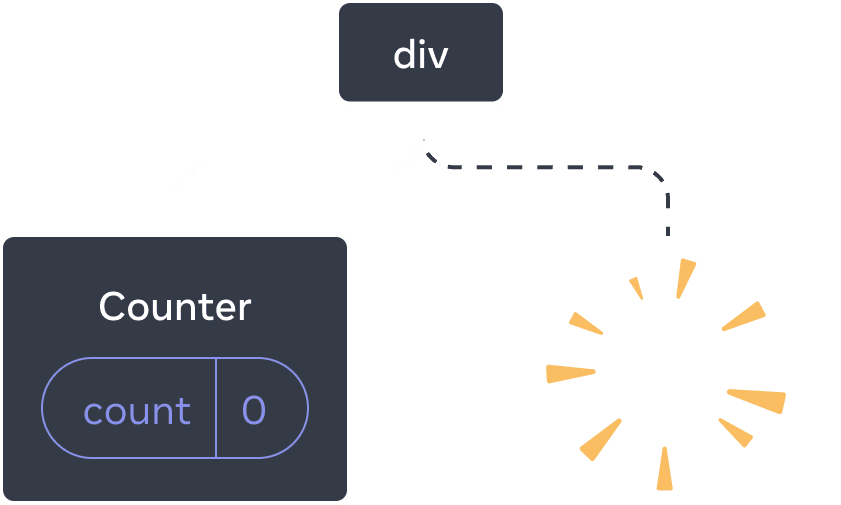
एक कॉम्पोनेन्ट हटाना
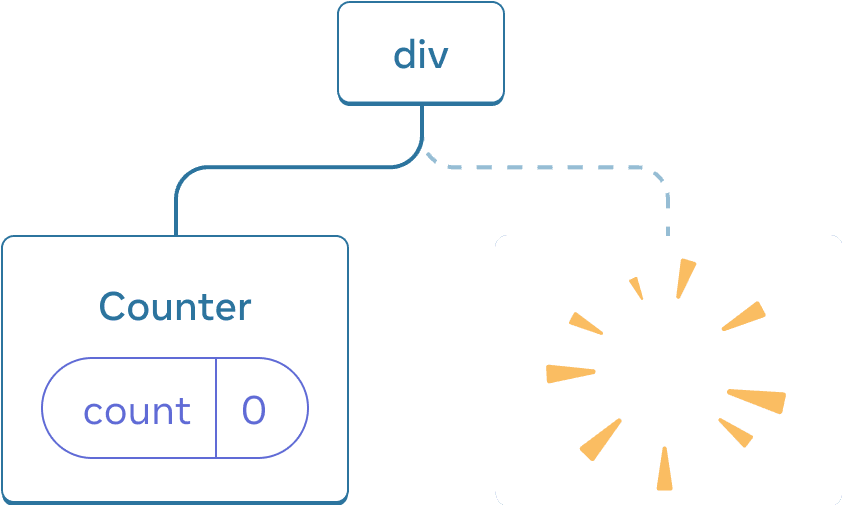
जब आप “Render the second counter” पर टिक करते हैं,
एक दूसरे Counter और उसकी state को स्क्रैच (score = 0) से आरंभ किया जाता है और DOM में जोड़ा जाता है।
एक कॉम्पोनेन्ट जोड़ना
रिएक्ट एक कॉम्पोनेन्ट की state को तब तक सुरक्षित रखता है जब तक इसे UI tree में अपनी state में रेंडर किया जा रहा है। यदि इसे हटा दिया जाता है, या एक अलग कॉम्पोनेन्ट को उसी state में रेंडर किया जाता है, तो react अपनी state को त्याग देता है।
Same component at the same position preserves state
इस उदाहरण में, दो अलग-अलग <Counter /> टैग हैं:
import { useState } from 'react';

export default function App() {
  const [isFancy, setIsFancy] = useState(false);
  return (
    <div>
      {isFancy ? (
        <Counter isFancy={true} />
      ) : (
        <Counter isFancy={false} />
      )}
      <label>
        <input
          type="checkbox"
          checked={isFancy}
          onChange={e => {
            setIsFancy(e.target.checked)
          }}
        />
        Use fancy styling
      </label>
    </div>
  );
}

function Counter({ isFancy }) {
  const [score, setScore] = useState(0);
  const [hover, setHover] = useState(false);

  let className = 'counter';
  if (hover) {
    className += ' hover';
  }
  if (isFancy) {
    className += ' fancy';
  }

  return (
    <div
      className={className}
      onPointerEnter={() => setHover(true)}
      onPointerLeave={() => setHover(false)}
    >
      <h1>{score}</h1>
      <button onClick={() => setScore(score + 1)}>
        Add one
      </button>
    </div>
  );
}
जब आप चेकबॉक्स को टिक या clear करते हैं, तो counter state रीसेट नहीं होती है। चाहे isFancy true हो या false, आपके पास रूट App कॉम्पोनेन्ट से लौटाए गए div के पहले चाइल्ड नोड के रूप में हमेशा एक <Counter /> होता है:
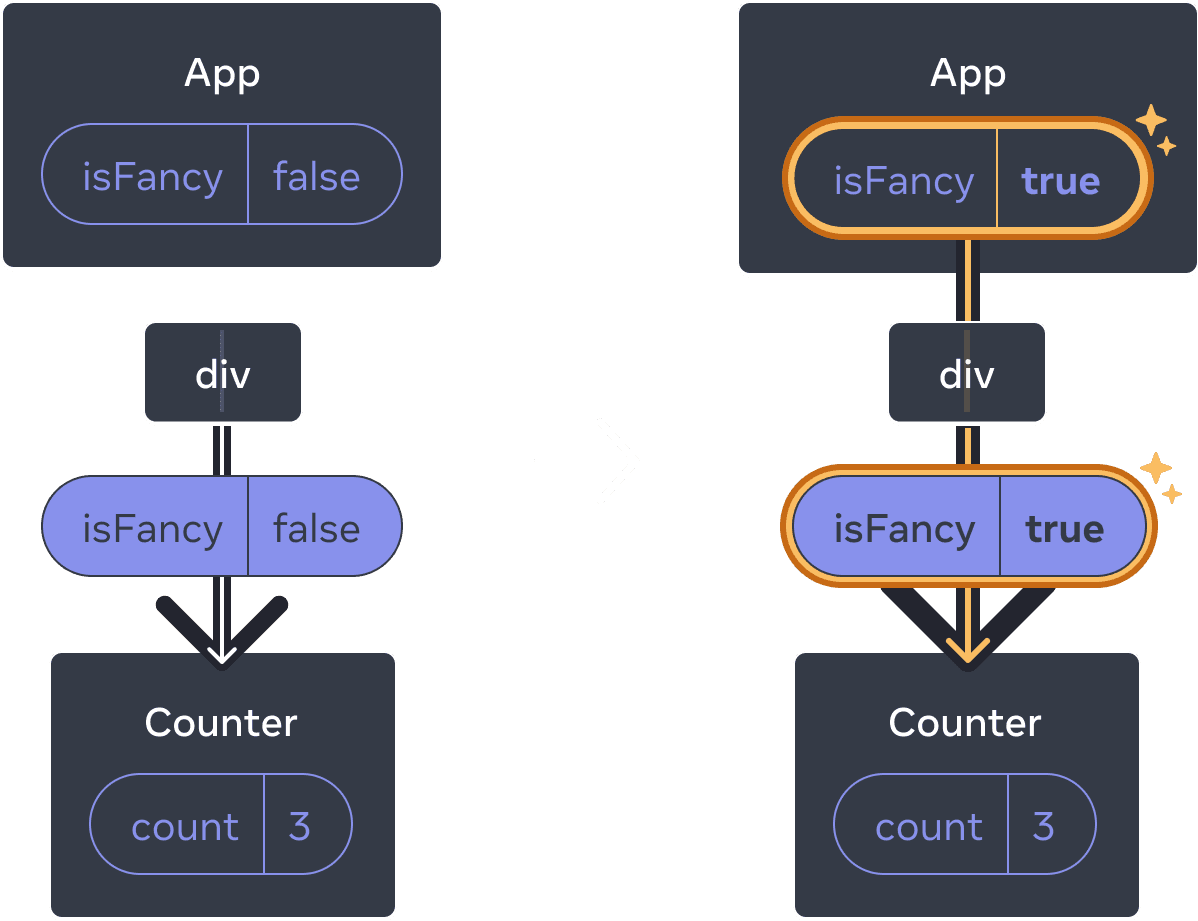
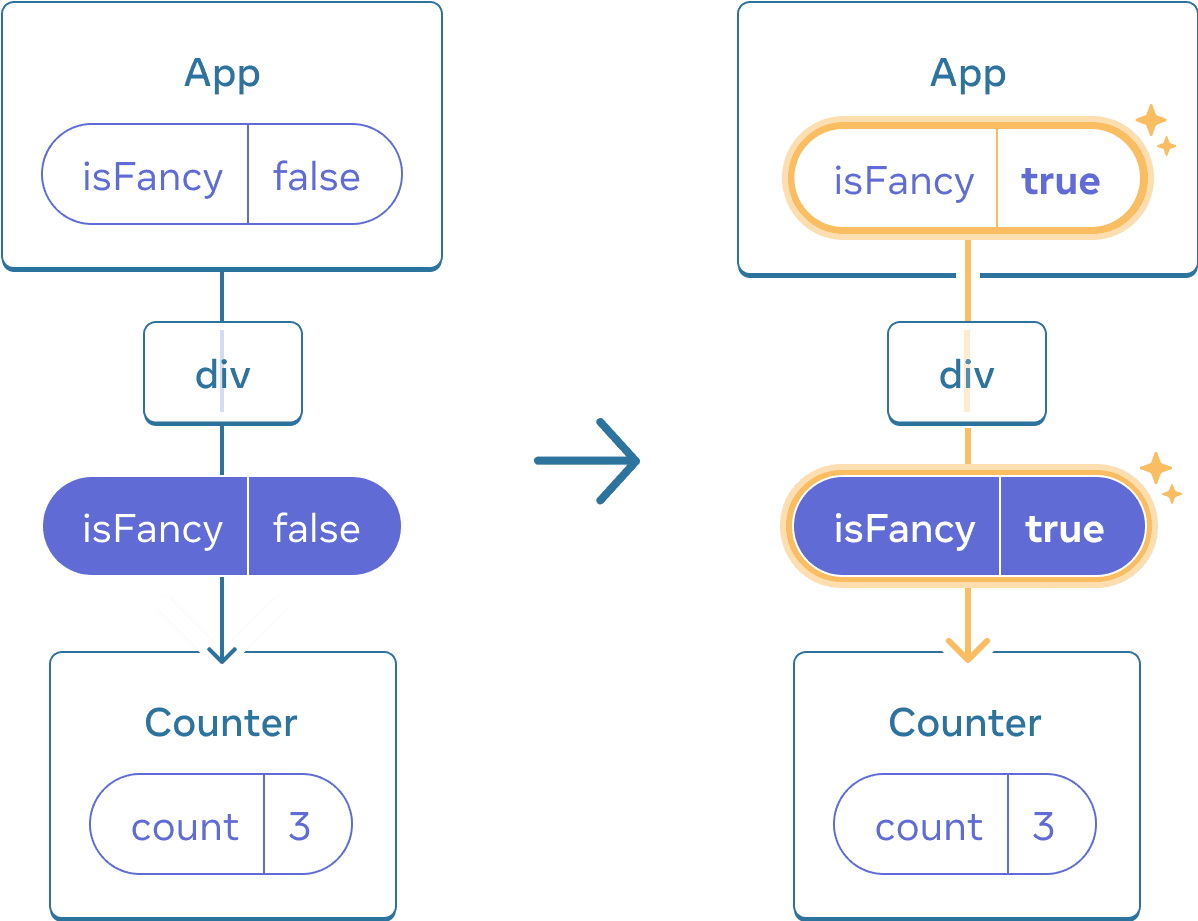
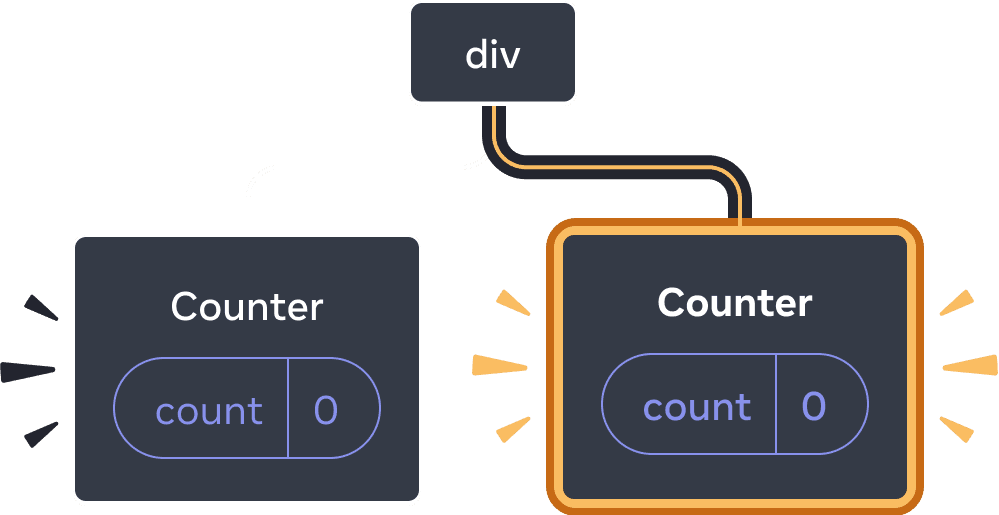
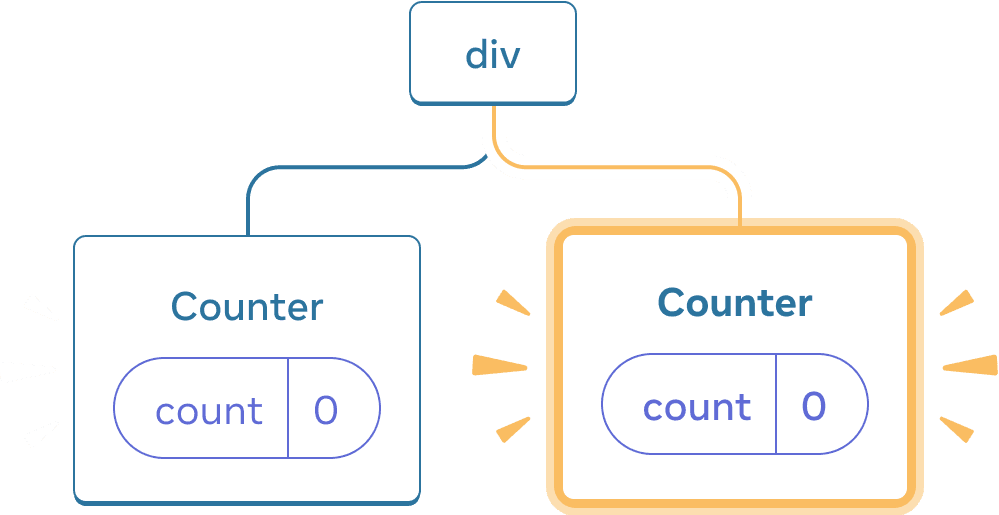
App की स्थिति को अपडेट करने से Counter रीसेट नहीं होता क्योंकि Counter उसी state में रहता है।
यह एक ही state में एक ही कॉम्पोनेन्ट है, इसलिए React के दृष्टिकोण से, यह एक ही Counter है।
एक ही स्थान में विभिन्न कॉम्पोनेन्ट state को रीसेट करते हैं
इस उदाहरण में, चेकबॉक्स पर टिक करने से <Counter> को <p> से बदल दिया जाएगा:
import { useState } from 'react';

export default function App() {
  const [isPaused, setIsPaused] = useState(false);
  return (
    <div>
      {isPaused ? (
        <p>See you later!</p>
      ) : (
        <Counter />
      )}
      <label>
        <input
          type="checkbox"
          checked={isPaused}
          onChange={e => {
            setIsPaused(e.target.checked)
          }}
        />
        Take a break
      </label>
    </div>
  );
}

function Counter() {
  const [score, setScore] = useState(0);
  const [hover, setHover] = useState(false);

  let className = 'counter';
  if (hover) {
    className += ' hover';
  }

  return (
    <div
      className={className}
      onPointerEnter={() => setHover(true)}
      onPointerLeave={() => setHover(false)}
    >
      <h1>{score}</h1>
      <button onClick={() => setScore(score + 1)}>
        Add one
      </button>
    </div>
  );
}
यहां, आप एक ही स्थान में different कॉम्पोनेन्ट प्रकारों के बीच स्विच करते हैं। प्रारंभ में, <div> के पहले child में एक Counter था। लेकिन जब आपने p में स्वैप किया, तो रिएक्ट ने यूआई ट्री से Counter को हटा दिया और इसकी state को नष्ट कर दिया।
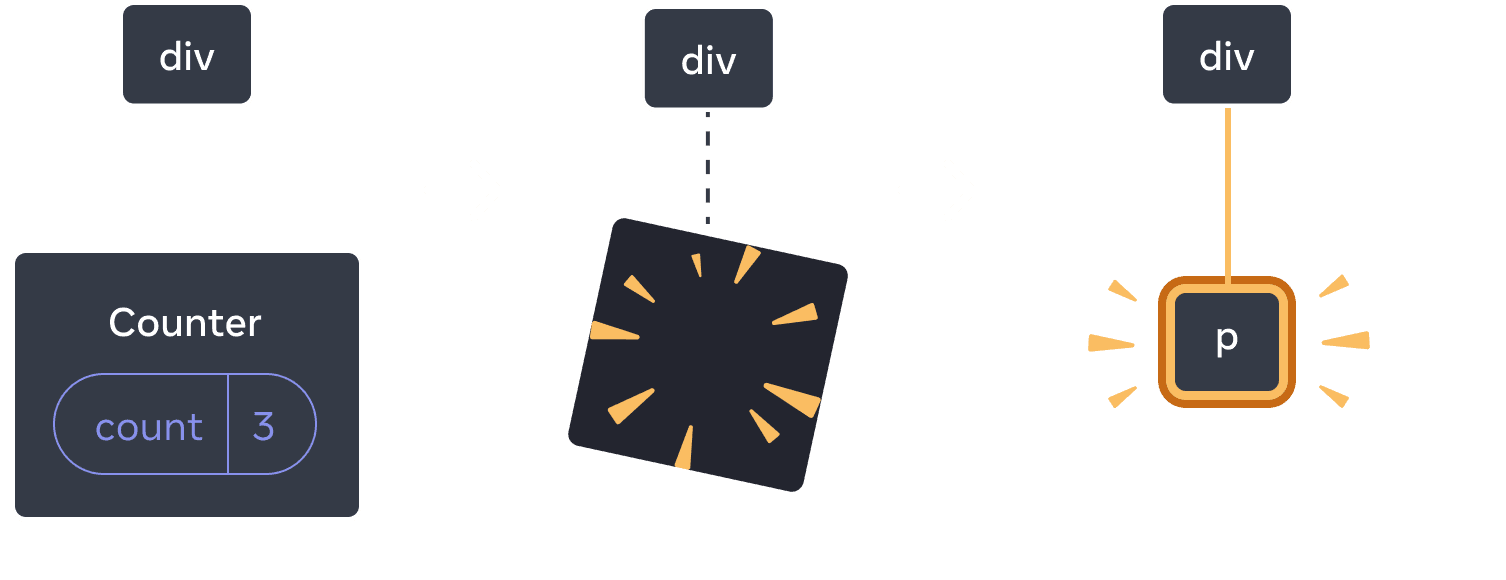
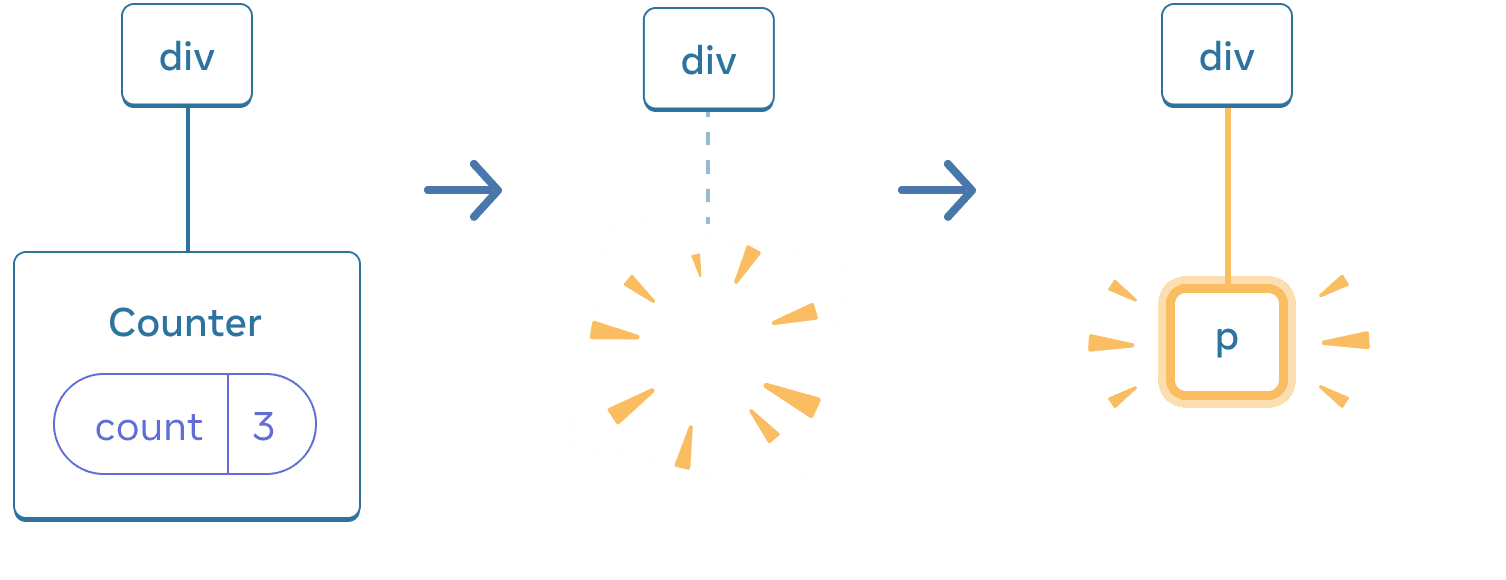
जब Counter p में बदल जाता है, तो Counter हटा दिया जाता है और p जोड़ा जाता है।
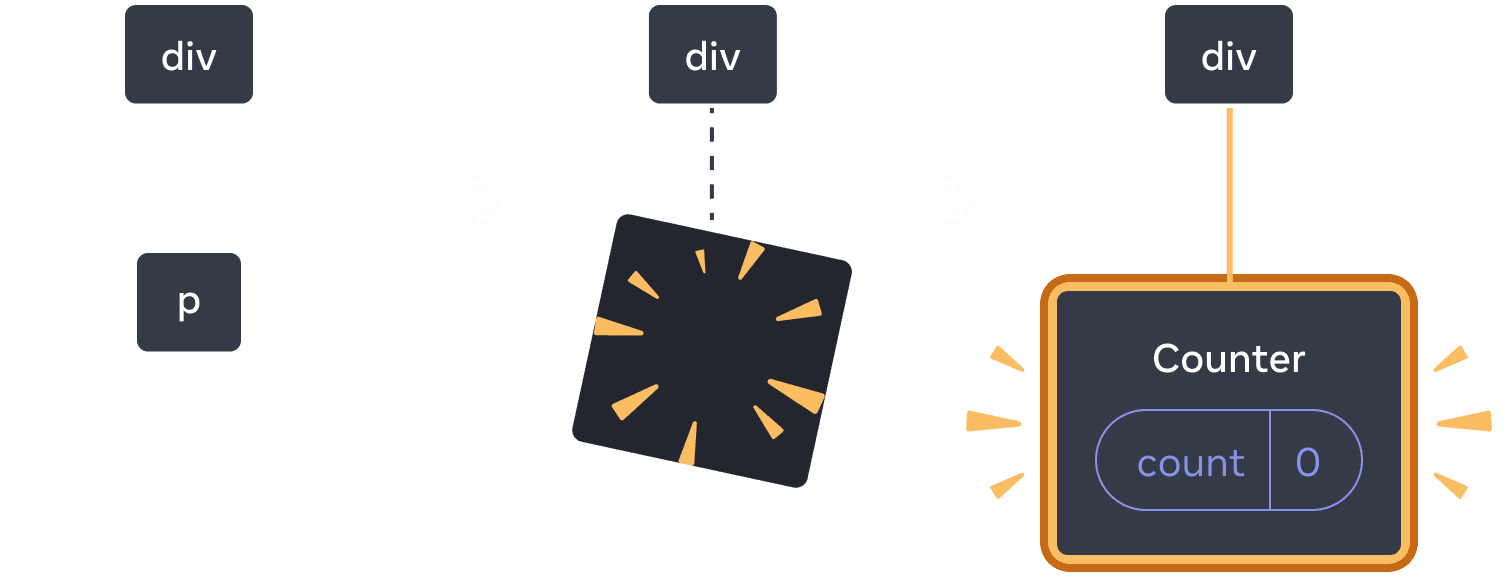
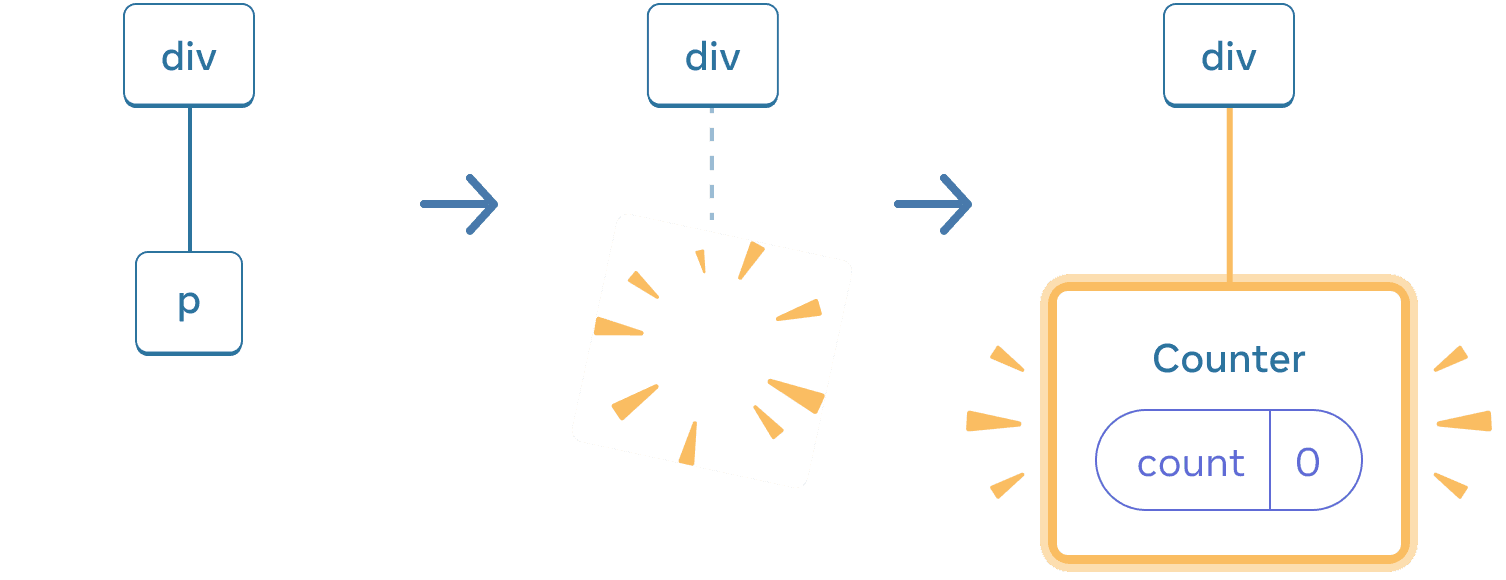
वापस स्विच करने पर, p हटा दिया जाता है और Counter जोड़ा जाता है।
साथ ही, जब आप किसी भिन्न कॉम्पोनेन्ट को एक ही स्थान में प्रस्तुत करते हैं, तो यह उसके संपूर्ण उपवृक्ष की state को रीसेट कर देता है। यह कैसे काम करता है यह देखने के लिए, काउंटर बढ़ाएं और फिर चेकबॉक्स पर टिक करें:
import { useState } from 'react';

export default function App() {
  const [isFancy, setIsFancy] = useState(false);
  return (
    <div>
      {isFancy ? (
        <div>
          <Counter isFancy={true} />
        </div>
      ) : (
        <section>
          <Counter isFancy={false} />
        </section>
      )}
      <label>
        <input
          type="checkbox"
          checked={isFancy}
          onChange={e => {
            setIsFancy(e.target.checked)
          }}
        />
        Use fancy styling
      </label>
    </div>
  );
}

function Counter({ isFancy }) {
  const [score, setScore] = useState(0);
  const [hover, setHover] = useState(false);

  let className = 'counter';
  if (hover) {
    className += ' hover';
  }
  if (isFancy) {
    className += ' fancy';
  }

  return (
    <div
      className={className}
      onPointerEnter={() => setHover(true)}
      onPointerLeave={() => setHover(false)}
    >
      <h1>{score}</h1>
      <button onClick={() => setScore(score + 1)}>
        Add one
      </button>
    </div>
  );
}
जब आप चेकबॉक्स पर क्लिक करते हैं तो काउंटर state रीसेट हो जाती है। यद्यपि आप एक काउंटर प्रस्तुत करते हैं, div का पहला child div से सेक्शन में बदल जाता है। जब child div को DOM से हटा दिया गया, तो उसके नीचे का पूरा tree (Counter और उसकी state सहित) भी नष्ट हो गया।
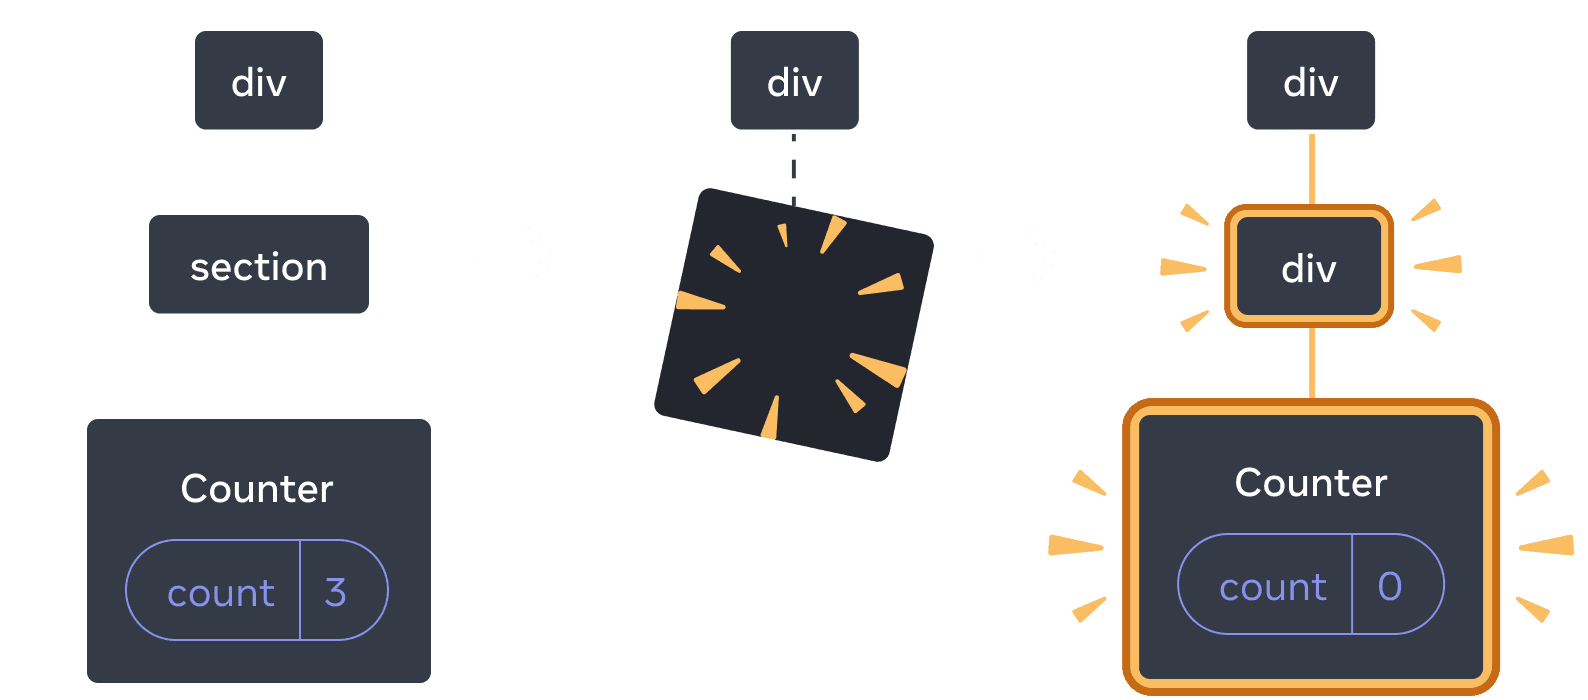
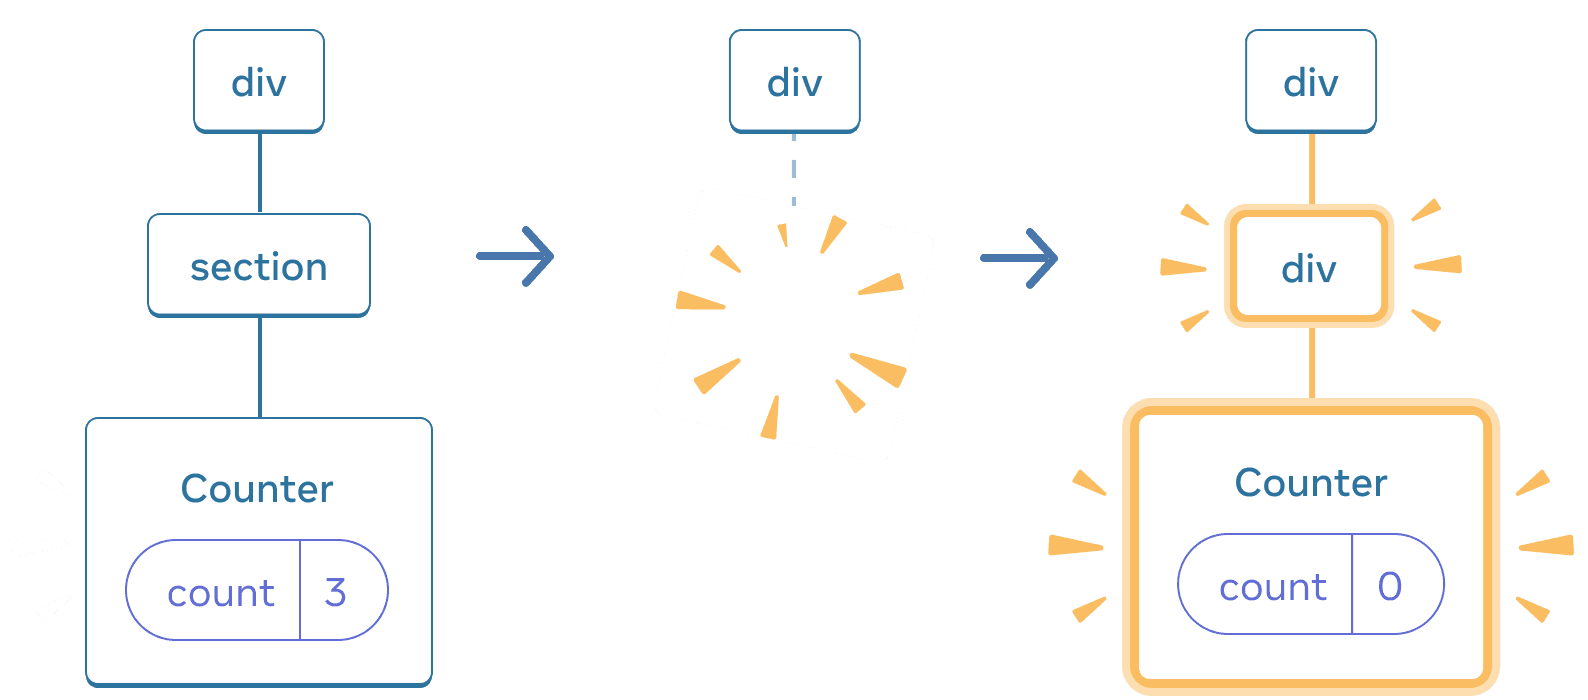
जब section div में बदलता है, तो section हटा दिया जाता है और नया div जोड़ा जाता है
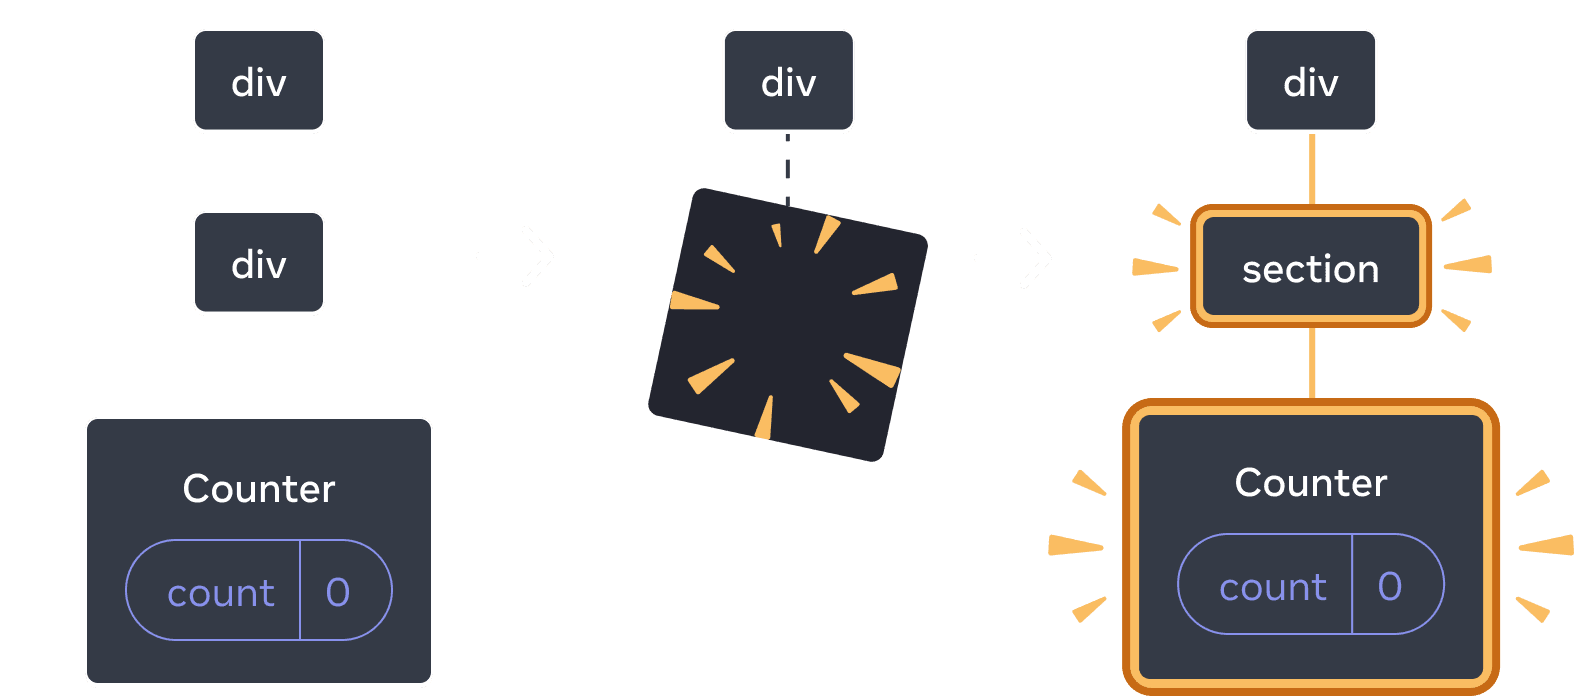

वापस स्विच करने पर, div हटा दिया जाता है और नया section जोड़ा जाता है
एक सामान्य नियम के रूप में, यदि आप री-रेंडर के बीच state को संरक्षित करना चाहते हैं, तो आपके tree की संरचना को एक रेंडर से दूसरे रेंडर में “match up” करना होगा। यदि संरचना भिन्न है, तो state नष्ट हो जाता है क्योंकि जब react tree से एक कॉम्पोनेन्ट को हटाता है तो वह state को नष्ट कर देता है।
state को उसी स्थान में रीसेट करना
डिफ़ॉल्ट रूप से, रिएक्ट एक कॉम्पोनेन्ट की state को संरक्षित करता है जबकि वह उसी स्थान में रहता है। आमतौर पर, यह वही है जो आप चाहते हैं, इसलिए यह डिफ़ॉल्ट व्यवहार के रूप में समझ में आता है। लेकिन कभी-कभी, आप किसी कॉम्पोनेन्ट की state को रीसेट करना चाह सकते हैं। इस ऐप पर विचार करें जो दो खिलाड़ियों को प्रत्येक मोड़ के दौरान उनके स्कोर पर नज़र रखने की सुविधा देता है:
import { useState } from 'react';

export default function Scoreboard() {
  const [isPlayerA, setIsPlayerA] = useState(true);
  return (
    <div>
      {isPlayerA ? (
        <Counter person="Taylor" />
      ) : (
        <Counter person="Sarah" />
      )}
      <button onClick={() => {
        setIsPlayerA(!isPlayerA);
      }}>
        Next player!
      </button>
    </div>
  );
}

function Counter({ person }) {
  const [score, setScore] = useState(0);
  const [hover, setHover] = useState(false);

  let className = 'counter';
  if (hover) {
    className += ' hover';
  }

  return (
    <div
      className={className}
      onPointerEnter={() => setHover(true)}
      onPointerLeave={() => setHover(false)}
    >
      <h1>{person}'s score: {score}</h1>
      <button onClick={() => setScore(score + 1)}>
        Add one
      </button>
    </div>
  );
}
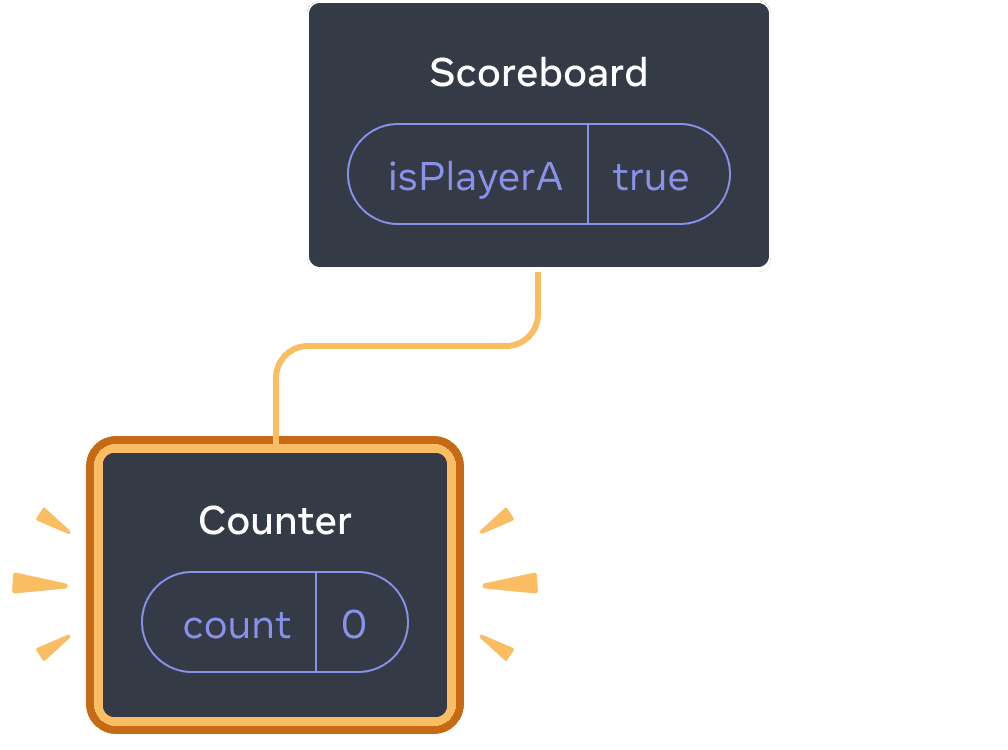
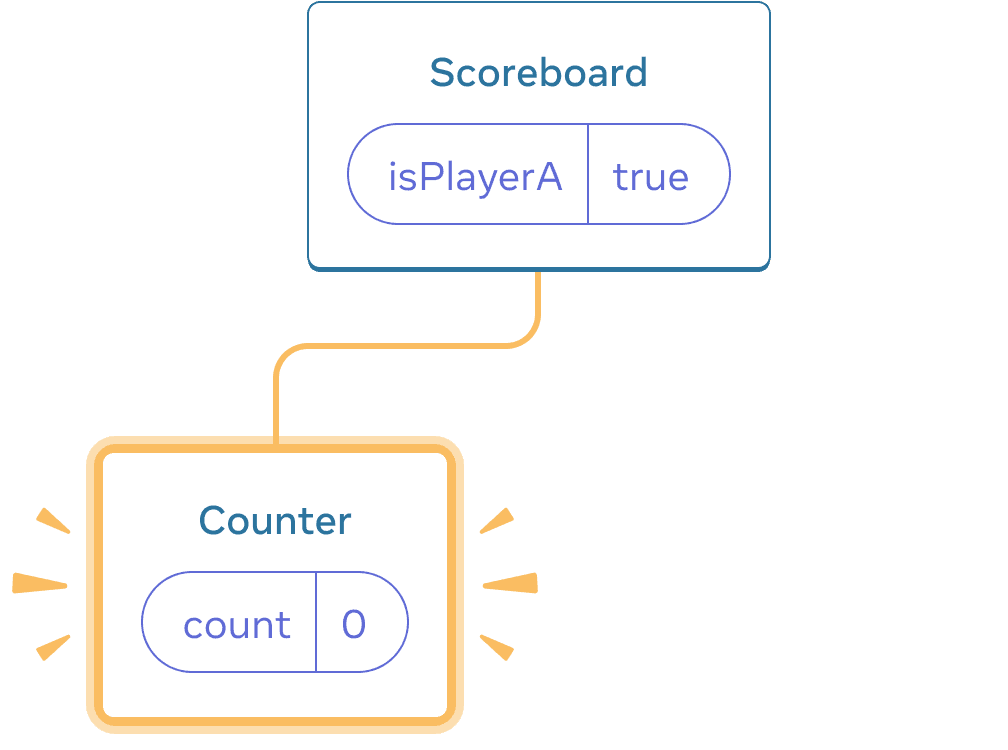
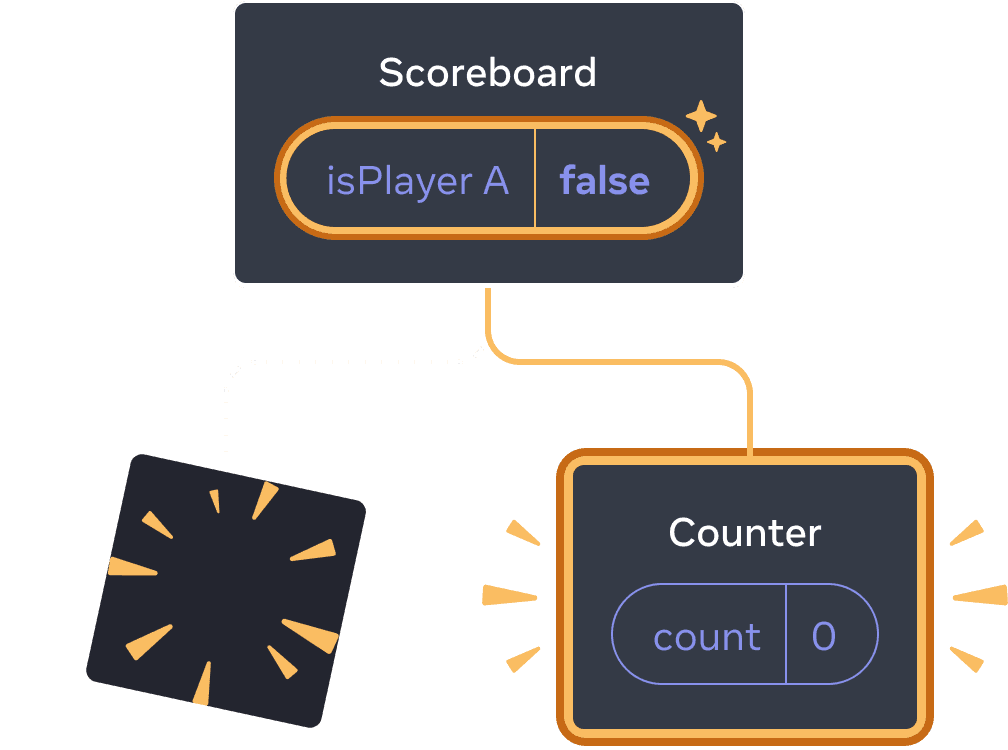
वर्तमान में, जब आप खिलाड़ी बदलते हैं, तो स्कोर संरक्षित रहता है। दो Counter एक ही स्थान में दिखाई देते हैं, इसलिए रिएक्ट उन्हें उसी Counter के रूप में देखता है जिसका person प्रोप बदल गया है।
लेकिन वैचारिक रूप से, इस ऐप में वे दो अलग-अलग काउंटर होने चाहिए। वे यूआई में एक ही स्थान पर दिखाई दे सकते हैं, लेकिन एक Taylor के लिए एक counter है, और दूसरा Sarah के लिए एक counter है।
उनके बीच स्विच करते समय state को रीसेट करने के दो तरीके हैं:
- कॉम्पोनेन्ट को विभिन्न स्थानों में प्रस्तुत करें
- प्रत्येक कॉम्पोनेन्ट को
keyके साथ एक स्पष्ट पहचान दें
विकल्प 1: एक कॉम्पोनेन्ट को विभिन्न स्थानों में प्रस्तुत करना
यदि आप चाहते हैं कि ये दोनों Counter स्वतंत्र हों, तो आप उन्हें दो अलग-अलग स्थानों में प्रस्तुत कर सकते हैं:
import { useState } from 'react';

export default function Scoreboard() {
  const [isPlayerA, setIsPlayerA] = useState(true);
  return (
    <div>
      {isPlayerA &&
        <Counter person="Taylor" />
      }
      {!isPlayerA &&
        <Counter person="Sarah" />
      }
      <button onClick={() => {
        setIsPlayerA(!isPlayerA);
      }}>
        Next player!
      </button>
    </div>
  );
}

function Counter({ person }) {
  const [score, setScore] = useState(0);
  const [hover, setHover] = useState(false);

  let className = 'counter';
  if (hover) {
    className += ' hover';
  }

  return (
    <div
      className={className}
      onPointerEnter={() => setHover(true)}
      onPointerLeave={() => setHover(false)}
    >
      <h1>{person}'s score: {score}</h1>
      <button onClick={() => setScore(score + 1)}>
        Add one
      </button>
    </div>
  );
}
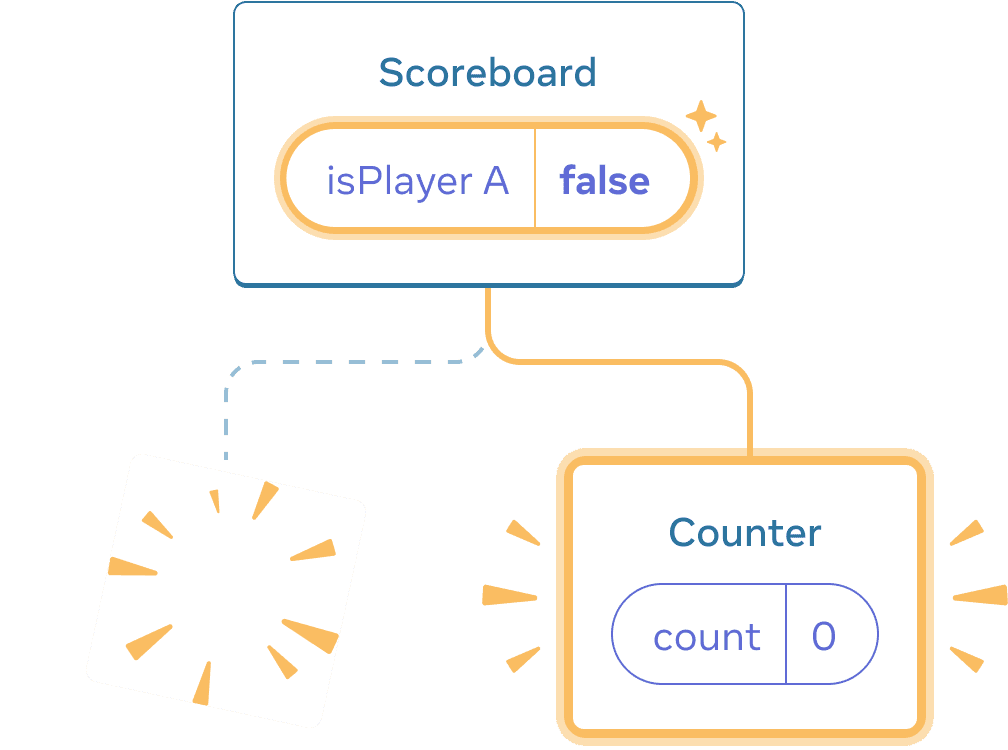
- प्रारंभ में,
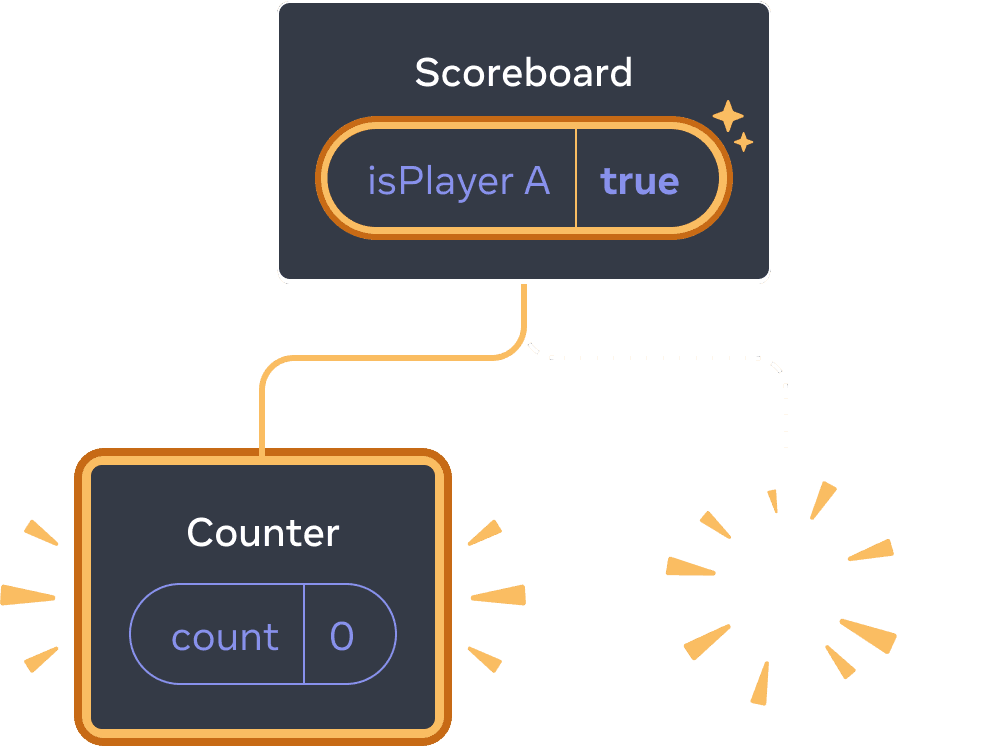
isPlayerAtrueहै। तो पहला स्थान में `Counter’ state है, और दूसरी state खाली है। - जब आप “Next player” बटन पर क्लिक करते हैं तो पहला स्थान साफ़ हो जाती है लेकिन दूसरे में अब एक
Counterहोता है।
आरंभिक state
Clicking “next”
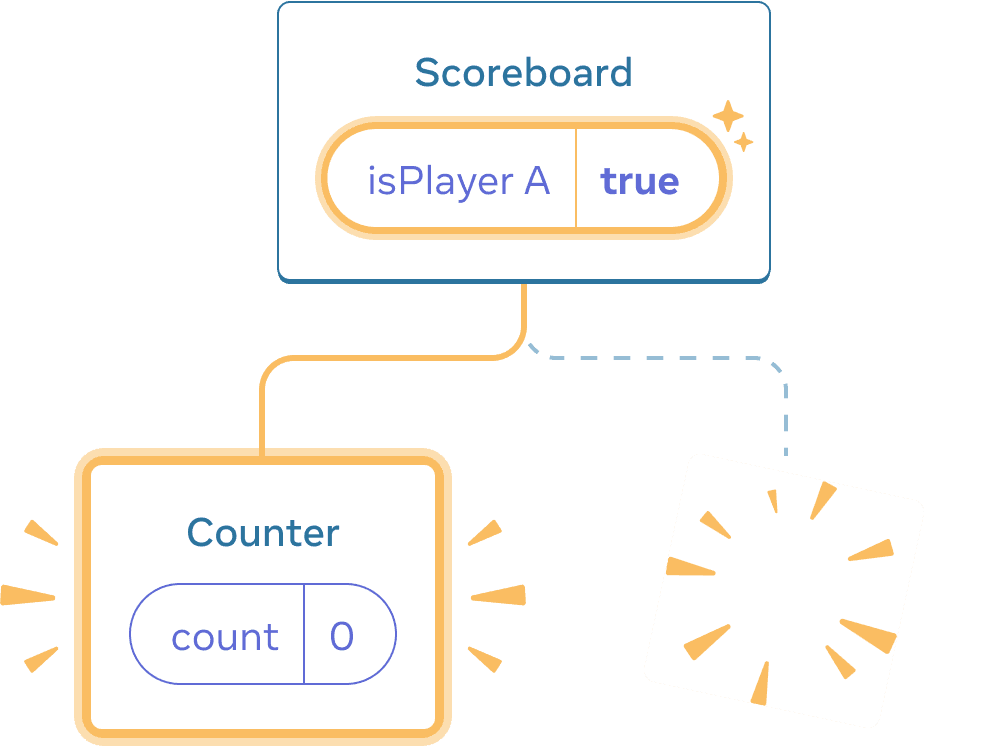
Clicking “next” again
प्रत्येक Counter की state हर बार DOM से हटाए जाने पर नष्ट हो जाती है। यही कारण है कि जब भी आप बटन क्लिक करते हैं तो वे रीसेट हो जाते हैं।
यह समाधान तब सुविधाजनक होता है जब आपके पास एक ही स्थान पर केवल कुछ स्वतंत्र कॉम्पोनेन्ट प्रस्तुत हों। इस उदाहरण में, आपके पास केवल दो हैं, इसलिए JSX में दोनों को अलग-अलग प्रस्तुत करना कोई परेशानी नहीं है।
विकल्प 2: एक key के साथ state को रीसेट करना
किसी कॉम्पोनेन्ट की state को रीसेट करने का एक और, अधिक सामान्य तरीका भी है।
आपने [सूचियाँ प्रस्तुत करते समय] key देखी होगी।(/learn/rendering-lists#keeping-list-items-in-order-with-key) keys केवल सूचियों के लिए नहीं हैं! आप रिएक्ट को किसी भी कॉम्पोनेन्ट के बीच अंतर करने के लिए keys का उपयोग कर सकते हैं। डिफ़ॉल्ट रूप से, रिएक्ट कॉम्पोनेन्ट के बीच अंतर करने के लिए parent (“पहला काउंटर”, “दूसरा काउंटर”) के भीतर ऑर्डर का उपयोग करता है।
लेकिन keys आपको रिएक्ट को यह बताने देती हैं कि यह केवल पहला काउंटर, या दूसरा काउंटर नहीं है, बल्कि एक विशिष्ट काउंटर है - उदाहरण के लिए, Taylor काउंटर। इस तरह, React को tree में जहां भी दिखाई देगा, Taylor के काउंटर का पता चल जाएगा!
इस उदाहरण में, दो <Counter />की state साझा नहीं करते हैं, भले ही वे JSX में एक ही स्थान पर दिखाई देते हों:
import { useState } from 'react';

export default function Scoreboard() {
  const [isPlayerA, setIsPlayerA] = useState(true);
  return (
    <div>
      {isPlayerA ? (
        <Counter key="Taylor" person="Taylor" />
      ) : (
        <Counter key="Sarah" person="Sarah" />
      )}
      <button onClick={() => {
        setIsPlayerA(!isPlayerA);
      }}>
        Next player!
      </button>
    </div>
  );
}

function Counter({ person }) {
  const [score, setScore] = useState(0);
  const [hover, setHover] = useState(false);

  let className = 'counter';
  if (hover) {
    className += ' hover';
  }

  return (
    <div
      className={className}
      onPointerEnter={() => setHover(true)}
      onPointerLeave={() => setHover(false)}
    >
      <h1>{person}'s score: {score}</h1>
      <button onClick={() => setScore(score + 1)}>
        Add one
      </button>
    </div>
  );
}
Taylor और Sarah के बीच स्विच करने से state सुरक्षित नहीं रहता। ऐसा इसलिए है क्योंकि आपने उन्हें अलग-अलग keys दी हैं:
{isPlayerA ? (
  <Counter key="Taylor" person="Taylor" />
) : (
  <Counter key="Sarah" person="Sarah" />
)}
key निर्दिष्ट करना रिएक्ट को मूल स्थान के भीतर उनके आदेश के बजाय, state के हिस्से के रूप में key का उपयोग करने के लिए कहता है। यही कारण है कि, भले ही आप उन्हें JSX में एक ही स्थान पर प्रस्तुत करते हैं, रिएक्ट उन्हें दो अलग-अलग काउंटरों के रूप में देखता है, और इसलिए वे कभी भी state साझा नहीं करेंगे। जब भी कोई काउंटर स्क्रीन पर दिखाई देता है, तो उसकी state बन जाती है। हर बार जब इसे हटाया जाता है, तो इसकी state नष्ट हो जाती है।
उनके बीच टॉगल करने से उनकी state बार-बार रीसेट हो जाती है।
एक key के साथ फॉर्म को रीसेट करना
forms से निपटते समय key के साथ state को रीसेट करना विशेष रूप से उपयोगी होता है।
इस चैट ऐप में, <Chat> कॉम्पोनेन्ट में टेक्स्ट इनपुट state शामिल है:
import { useState } from 'react';
import Chat from './Chat.js';
import ContactList from './ContactList.js';

export default function Messenger() {
  const [to, setTo] = useState(contacts[0]);
  return (
    <div>
      <ContactList
        contacts={contacts}
        selectedContact={to}
        onSelect={contact => setTo(contact)}
      />
      <Chat contact={to} />
    </div>
  )
}

const contacts = [
  { id: 0, name: 'Taylor', email: 'taylor@mail.com' },
  { id: 1, name: 'Alice', email: 'alice@mail.com' },
  { id: 2, name: 'Bob', email: 'bob@mail.com' }
];
इनपुट में कुछ दर्ज करने का प्रयास करें, और फिर एक अलग प्राप्तकर्ता चुनने के लिए “Alice” या “Bob” दबाएँ। आप देखेंगे कि इनपुट state संरक्षित है क्योंकि <Chat> को tree में उसी state में प्रस्तुत किया गया है।
कई ऐप्स में, यह वांछित व्यवहार हो सकता है, लेकिन चैट ऐप में नहीं!
आप किसी आकस्मिक क्लिक के कारण उपयोगकर्ता को वह संदेश किसी गलत व्यक्ति को भेजने नहीं देना चाहेंगे जो उन्होंने पहले ही टाइप कर दिया है। इसे ठीक करने के लिए, एक key जोड़ें:
<Chat key={to.id} contact={to} />यह सुनिश्चित करता है कि जब आप एक अलग प्राप्तकर्ता का चयन करते हैं, तो Chat कॉम्पोनेन्ट को स्क्रैच से फिर से बनाया जाएगा, जिसमें इसके नीचे के tree में कोई भी state शामिल होगी।
रिएक्ट DOM तत्वों का पुन: उपयोग करने के बजाय उन्हें फिर से बनाएगा।
अब प्राप्तकर्ता को स्विच करने से हमेशा टेक्स्ट फ़ील्ड साफ़ हो जाता है:
import { useState } from 'react';
import Chat from './Chat.js';
import ContactList from './ContactList.js';

export default function Messenger() {
  const [to, setTo] = useState(contacts[0]);
  return (
    <div>
      <ContactList
        contacts={contacts}
        selectedContact={to}
        onSelect={contact => setTo(contact)}
      />
      <Chat key={to.id} contact={to} />
    </div>
  )
}

const contacts = [
  { id: 0, name: 'Taylor', email: 'taylor@mail.com' },
  { id: 1, name: 'Alice', email: 'alice@mail.com' },
  { id: 2, name: 'Bob', email: 'bob@mail.com' }
];
Deep Dive
एक वास्तविक चैट ऐप में, जब उपयोगकर्ता पिछले प्राप्तकर्ता को फिर से चुनता है तो आप शायद इनपुट state को पुनर्प्राप्त करना चाहेंगे। ऐसे कॉम्पोनेन्ट की state को “जीवित” रखने के कुछ तरीके हैं जो अब दिखाई नहीं देते हैं:
- आप केवल वर्तमान चैट के बजाय all चैट प्रस्तुत कर सकते हैं, लेकिन CSS के साथ अन्य सभी को छिपा सकते हैं। चैट को tree से नहीं हटाया जाएगा, इसलिए उनकी स्थानीय state संरक्षित रहेगी। यह समाधान सरल UI के लिए बढ़िया काम करता है। लेकिन यदि छिपे हुए tree बड़े हैं और उनमें बहुत सारे DOM नोड हैं तो यह बहुत धीमा हो सकता है।
- आप state को ऊपर उठा सकते हैं और मूल कॉम्पोनेन्ट में प्रत्येक प्राप्तकर्ता के लिए लंबित संदेश को रोक कर रख सकते हैं। इस तरह, जब चाइल्ड कॉम्पोनेन्ट हटा दिए जाते हैं, तो इससे कोई फर्क नहीं पड़ता, क्योंकि यह parent ही हैं जो महत्वपूर्ण जानकारी रखते हैं। यह सबसे आम समाधान है.
- आप React state के अतिरिक्त किसी भिन्न स्रोत का भी उपयोग कर सकते हैं। उदाहरण के लिए, आप संभवतः चाहते हैं कि संदेश ड्राफ्ट बना रहे, भले ही उपयोगकर्ता गलती से page बंद कर दे। इसे लागू करने के लिए, आप ‘Chat’ कॉम्पोनेन्ट को
localStorageसे पढ़कर अपनी state आरंभ करवा सकते हैं। और वहां ड्राफ्ट भी सहेजें।
इससे कोई फर्क नहीं पड़ता कि आप कौन सी रणनीति चुनते हैं, Alice_ के साथ चैट वैचारिक रूप से Bob_ के साथ चैट से अलग है, इसलिए वर्तमान प्राप्तकर्ता के आधार पर <Chat> ट्री को `key’ देना समझ में आता है।
Recap
- React तब तक state बनाए रखता है जब तक एक ही कॉम्पोनेन्ट को एक ही स्थान में प्रस्तुत किया जाता है।
- state को JSX टैग में नहीं रखा गया है। यह उस tree की state से जुड़ा है जिसमें आपने उस JSX को रखा है।
- आप किसी subtree को एक अलग keys देकर उसकी state को रीसेट करने के लिए बाध्य कर सकते हैं।
- कॉम्पोनेन्ट परिभाषाओं को घोंसला न बनाएं, अन्यथा आप दुर्घटनावश state रीसेट कर देंगे।
Challenge 1 of 5: गायब हो रहे इनपुट टेक्स्ट को ठीक करें
जब आप बटन दबाते हैं तो यह उदाहरण एक संदेश दिखाता है। हालाँकि, बटन दबाने से भी गलती से इनपुट रीसेट हो जाता है। ऐसा क्यूँ होता है? इसे ठीक करें ताकि बटन दबाने से इनपुट टेक्स्ट रीसेट न हो।
import { useState } from 'react';

export default function App() {
  const [showHint, setShowHint] = useState(false);
  if (showHint) {
    return (
      <div>
        <p><i>Hint: Your favorite city?</i></p>
        <Form />
        <button onClick={() => {
          setShowHint(false);
        }}>Hide hint</button>
      </div>
    );
  }
  return (
    <div>
      <Form />
      <button onClick={() => {
        setShowHint(true);
      }}>Show hint</button>
    </div>
  );
}

function Form() {
  const [text, setText] = useState('');
  return (
    <textarea
      value={text}
      onChange={e => setText(e.target.value)}
    />
  );
}